

4 min read
As of 2016, Facebook boasts 1.59 billion monthly active users on its platform. To put that into more tangible terms, the population of India is roughly 1.252 billion and America is 303 million. So if Facebook were a country, it would be about as large as America and India combined.
So with that in perspective, are you positive you're using Facebook as efficiently as you could be?

One of the newest and more popular updates to Facebook is the ability to create and promote online events. While Facebook events largely started out as a way to let all of your friends know quickly and easily that you were hosting a Tailgating party before the big football game, it has now transformed into a powerful business tool.
Consider it this way. Your audience is already hanging out on Facebook and relying on events to keep them abreast of local happenings and free events, but since the start of the pandemic, people are less inclined to venture out. People have grown to inherently trust Facebook and its recommendations with the uptick of "suggested posts."
Not only is your audience already looking and trusting of events, they are waiting to hear from you. As people select "Interested" or "Attending" on an event, Facebook immediately suggests several more "Related" events.
What factors into Related events, you ask? A number of things! Location, popularity, selected keyword tags, and your dollars, as a starter.
So, in the event you are considering adding Facebook Online Events into your Social Media Marketing strategy this year, here's a step by step guide! I will use the example of building an event for an Open House of a brand new build, but this is applicable to any online event you may be hosting in the near future!
Step 1: Find your Company Facebook Page and Select "Event"
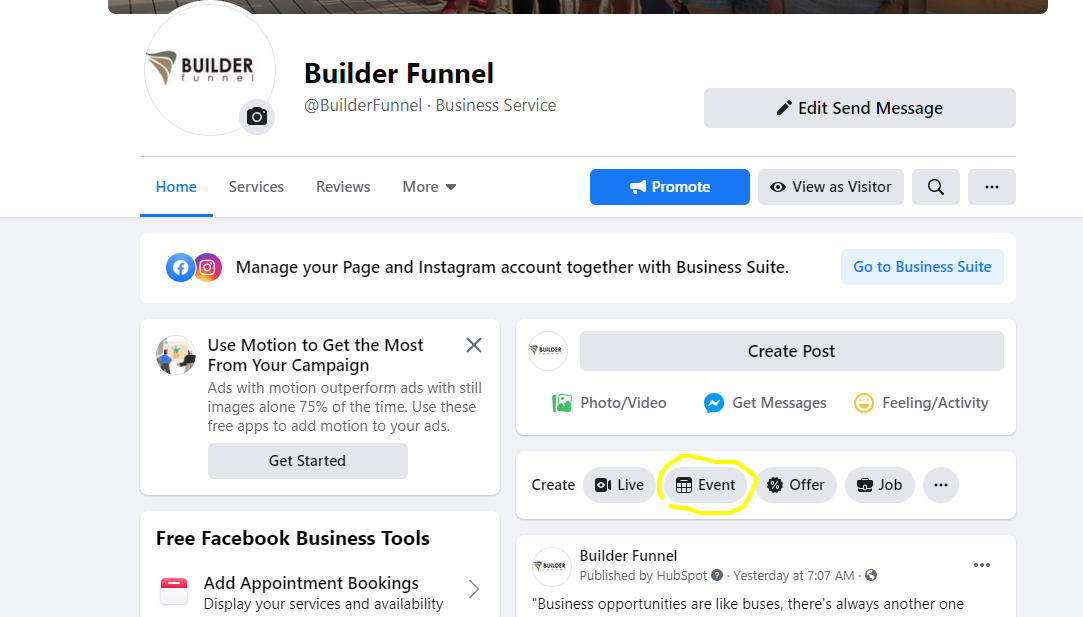
First, select the Event option in your status update bar.
When the option menu opens up, select "Online Event."
From here you will be able to build your event with all of your specific details
Step 2: Build Your Company Event
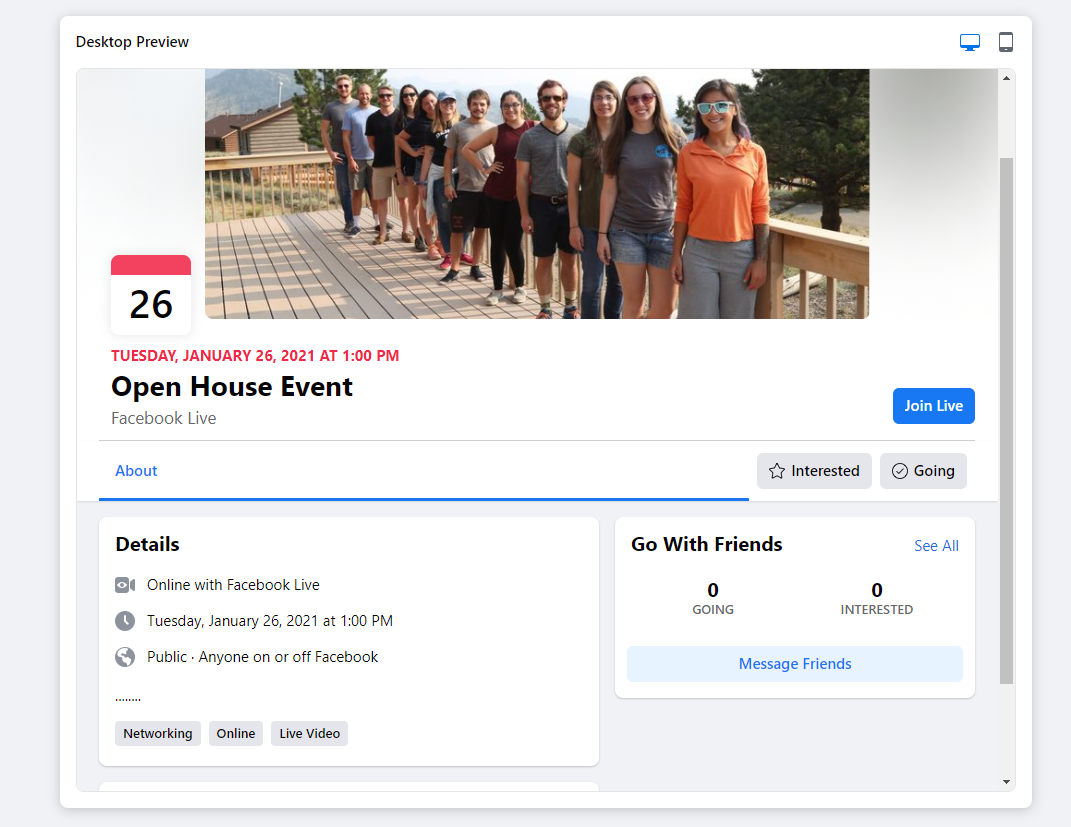
Once you have reached this option, you will be asked to fill out the following information:
- Location: Even though you won't be hosting at a physical location, adding a location will allow Facebook to show the specific time zone you will be hosting in. You will also be able to pick the streaming site you will be hosting from (Facebook Live is most common, but you can pick an external site if it works better for you).
- Start/End Time: Include an accurate time for your event. This can integrate directly into Calendars and will allow for people to make plans around the time you select.
- Select Category: You are given several options to help you find the right audience in the Categories section. You can select anything from Art, Causes, Community, Entertainment, Food & Drinks, Interests, Learning, and Sports & Fitness. In each category, you given the option to narrow down your event type even further, ensuring that the right people who are interested in your event will see it.
- Description: Write a brief of your event in this fill-in-the-blank box. While keywords in the description don't matter nearly as much as the Categories and Tags, it will always help to have a clear explanation and incentive for those who are genuinely interested in attending your event. Keep in mind that for many, they have never heard of your brand before and will need an explanation of who you are and why they should trust you!
- Tags: This is one of the more complicated elements to building events. First, do some keyword research. With a better understanding of what people may be searching in Facebook when they are looking for your services, you will have a better idea of what to enter here. This comes with time, though, so for your first event, simply start typing what keywords you think would draw your target audience in. Facebook will finish your tags for you. These tags are essentially topics that people on Facebook have "Liked," showing their interest in the topic and pulling into the Suggested Events algorithm. If you aren't sure which tags to select as you start typing, always choose one with more "Likes."
- Ticket URL: If your event requires an RSVP for attendance, this is where you will enter a link to the page where you want people to let you know if they're coming. If you don't need to know the attendance number for the event, you can always link directly to your website! This is where we recommend sending people to a landing page so that they can fill out a form to RSVP or get more information. Not only do you know your attendance numbers better, but you will also be capturing new lead information! If you don't have a landing page to send leads to, then you could include a phone number in your description for people to reach you with more questions.
- Co-Hosts: This field allows you to tag other Pages in your event. For example, if you will have a staged house for your open house, you could tag the Interior Designer, a Real Estate Agent, and any other number of Facebook Pages. This will help your event show up in the Facebook Feeds and Suggested Events of more audiences as you tag more profiles. If you don't have any co-hosts, you can simply leave this field empty.
Step 3: Publish and Share Your Facebook Event!
After filling out all of the necessary fields to build your online event, you can publish it! You will have the option to Invite specific people and to promote your event. If you don't choose to do so upon publishing, you can always return later to do so!
Your Facebook Online Event will gain more interest and eventually more impressions the more you share it. Feel free to send out a link in an email, share it on Facebook and other social channels, or even tell your clients to go like your page on Facebook to follow your events!
They will be able to access your events directly from your Company Facebook Page.
If you decide to "Boost" your event in order to promote it, you can always return to your event and select "Boost Event."
This will require you to pay $1 a day (or more if you'd like) to reach new audiences that it wouldn't organically be able to reach. It also enables your event to show up in more Related Events feeds.
When it comes time for the online event to take place, you're ready to go live! If you need help figuring out how to use Facebook live, take a look at this helpful how-to article directly from Facebook themselves.
The Social Media Checklist
for Remodelers
Leave outdated tactics and ineffective strategies behind. Grow your audience, improve engagement, and generate leads through the most popular social networks.
